
Learning how to evaluate price lists is one of the most important tasks in selling successfully on Amazon when sourcing inventory via wholesale.
Evaluating wholesale price lists is the key way in which we figure out which products will be profitable for our business to sell on Amazon. We are able to quickly evaluate how fast we can expect items to sell, and how much profit we can expect to make.
Typically when you open a wholesale account with your supplier, one of the first things you will get from them is a list of products they sell with the prices of the items. You might hear this referred to as a product catalog, line sheet, or other similar terms.
For our purposes, we are using the term price list to encompass all of these terms. If you are brand new to wholesale, you can read our guide on getting started with wholesale sourcing here.
As soon as you get a price list it’s time to go to work evaluating which products to buy. You can do this manually by copying and pasting each item from the price list into Amazon, but this is a very manual process.
Fortunately there are some software tools out there that can take you from a list of products to a spreadsheet with the data you need to make a buying decision in a matter of minutes.
In this post we’ll walk through a couple options for software tools, how to use them, and we’ll also cover what to do if your price list does require manually going through item by item.
By the end of the post, you will know how to quickly get all of the data points you need to give yourself the best possible chance of purchasing profitable inventory that will sell quickly.
Tools to Evaluate Wholesale Price Lists
Every successful wholesale seller uses a tool to help them speed up the process of evaluating wholesale price lists. In this post we’ll take an in depth look at the 2 we use most in our business.
Price Checker 2 (PC2)
Price Checker 2 is the tool we use most often for evaluating wholesale price lists in our business. Let’s dive into some of the features to show why.

This tool allows you to quickly access just about any data point about the item on Amazon that you need to make a purchasing decision. Want to know the average price of the item in the last 90 days on Amazon? Average sales rank over the last 30 days? If Amazon is a seller? how many offers that are priced competitively with the buy box?
All of those data points are available through PC2! The evaluation file you will get after running your file through PC2 will have the information you need to determine what products you want to order from your supplier.
In the following section we walk through how you go from a price list, to a file that has all of the data available you need to make a buying decision. It’s important to note that you will need to have your price list in a spreadsheet format with prices and UPCs to use this tool.
Price Checker 2 Walk Through
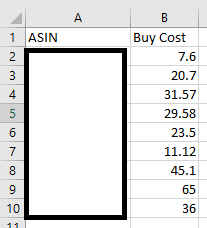
In the first step with any evaluation tool, you will need to provide at least two pieces of information included in your price list:
- A product identifier (ASIN or UPC)
- The cost of the item
You will need to set up the excel sheet as shown below with the corresponding titles in the headers. Now that these two columns are set up, save the file as an .xlsx or .csv file to your computer.
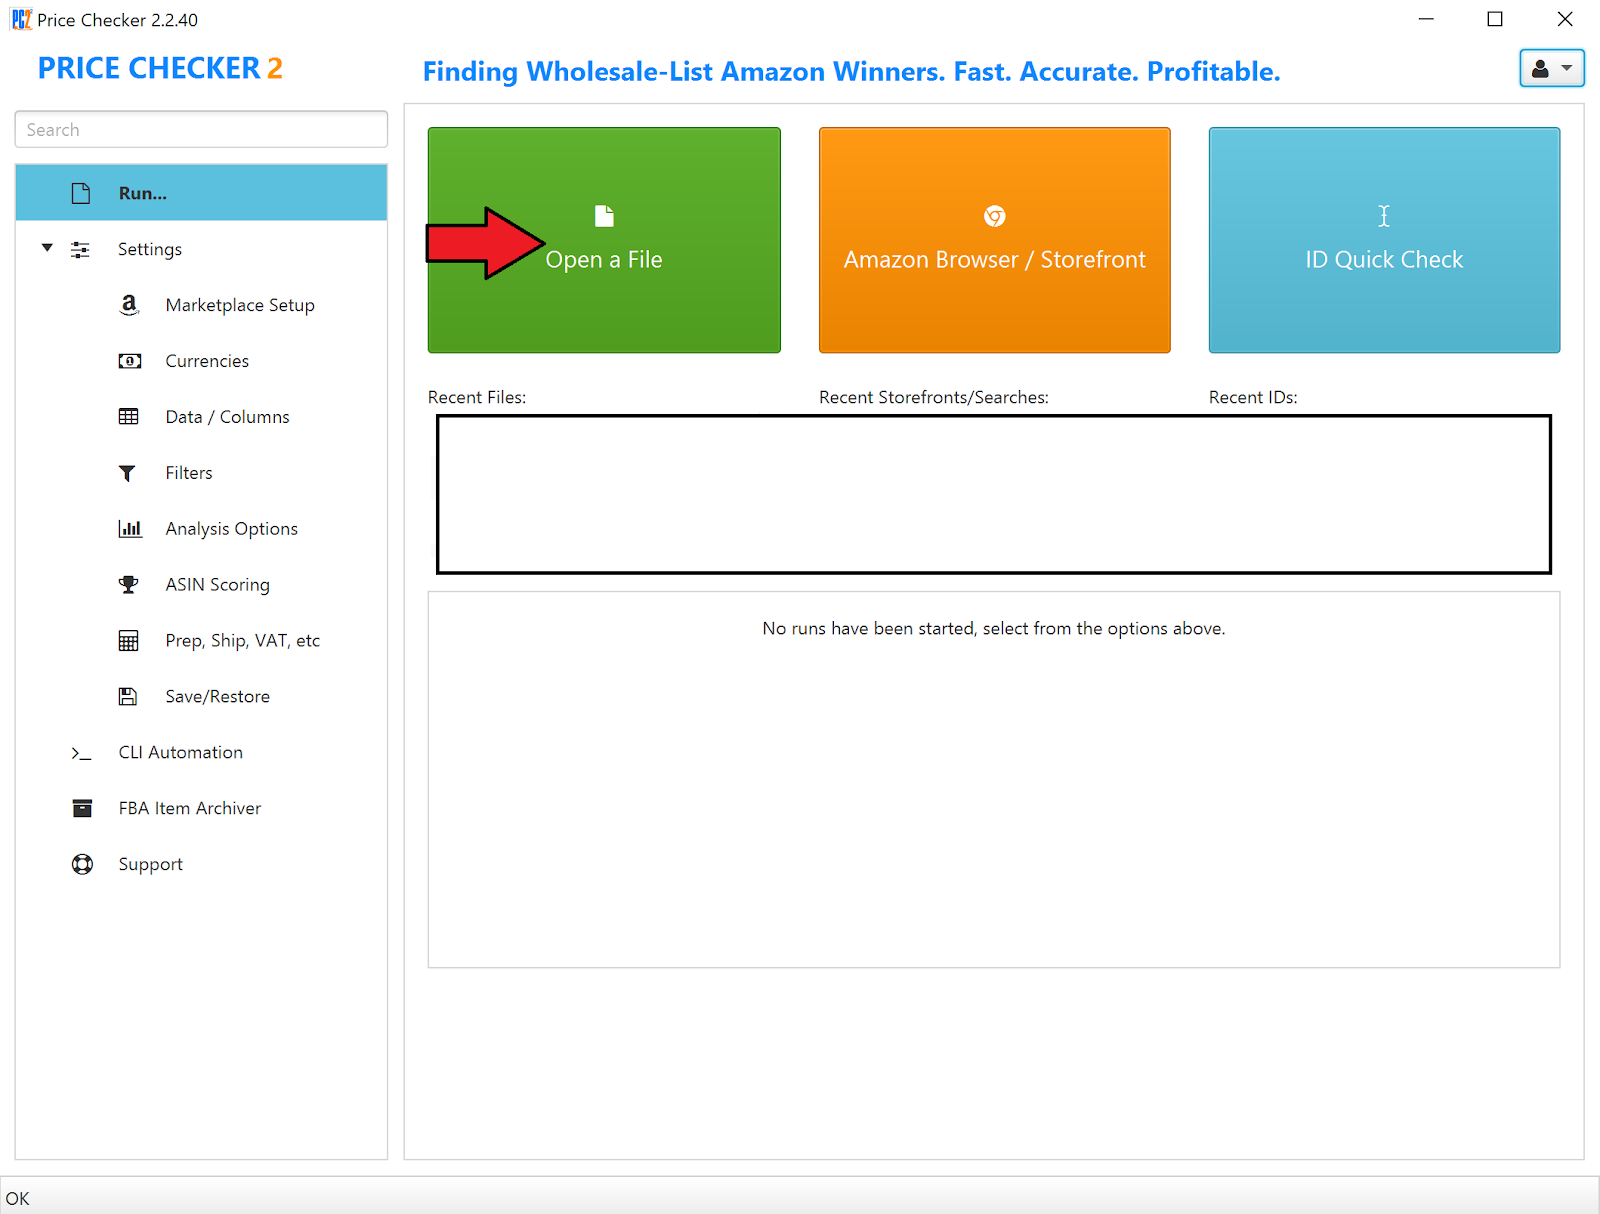
Now open PC2 after downloading the software and setting up an account.
Click “Open a File” as the red arrow below shows, and select the Excel file of your price list to import the document into the software.
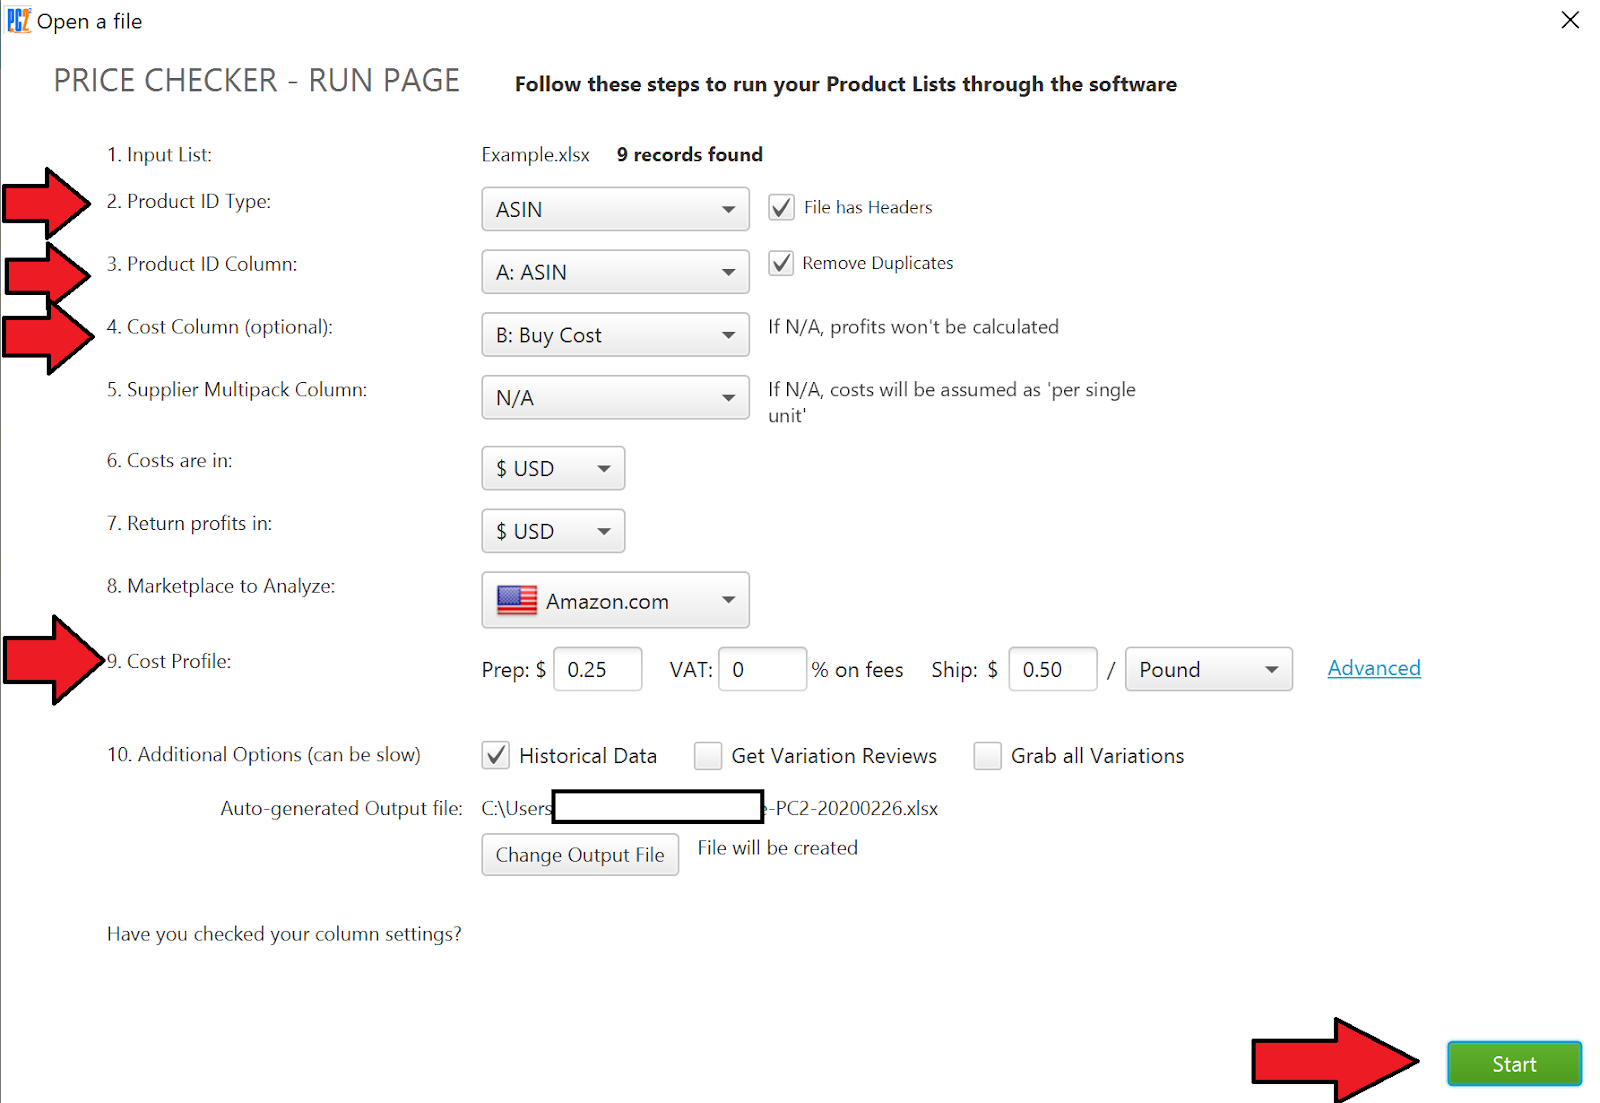
Now that the file has been uploaded, verify the column headers from your file match the existing populated fields in the next screenshot below.
For this example, make sure the ASIN column is our product ID. If you are using UPC as your product identifier, the select UPC.
Then make sure the cost column matches the title from the file in column B which was titled “Buy Cost”. In this example, the setup is pretty straight forward, but you’ll want to make sure the columns are selected correctly if you are uploading files with many different titles in the header row.
Lastly, setup the cost profile section. In this section you can factor in prep and shipping costs into the ROIs that are calculated by the software. If you don’t want these additional costs factored in, you can leave them blank.
At this point everything is setup to begin the search and it’s time to click “Start” as shown below.
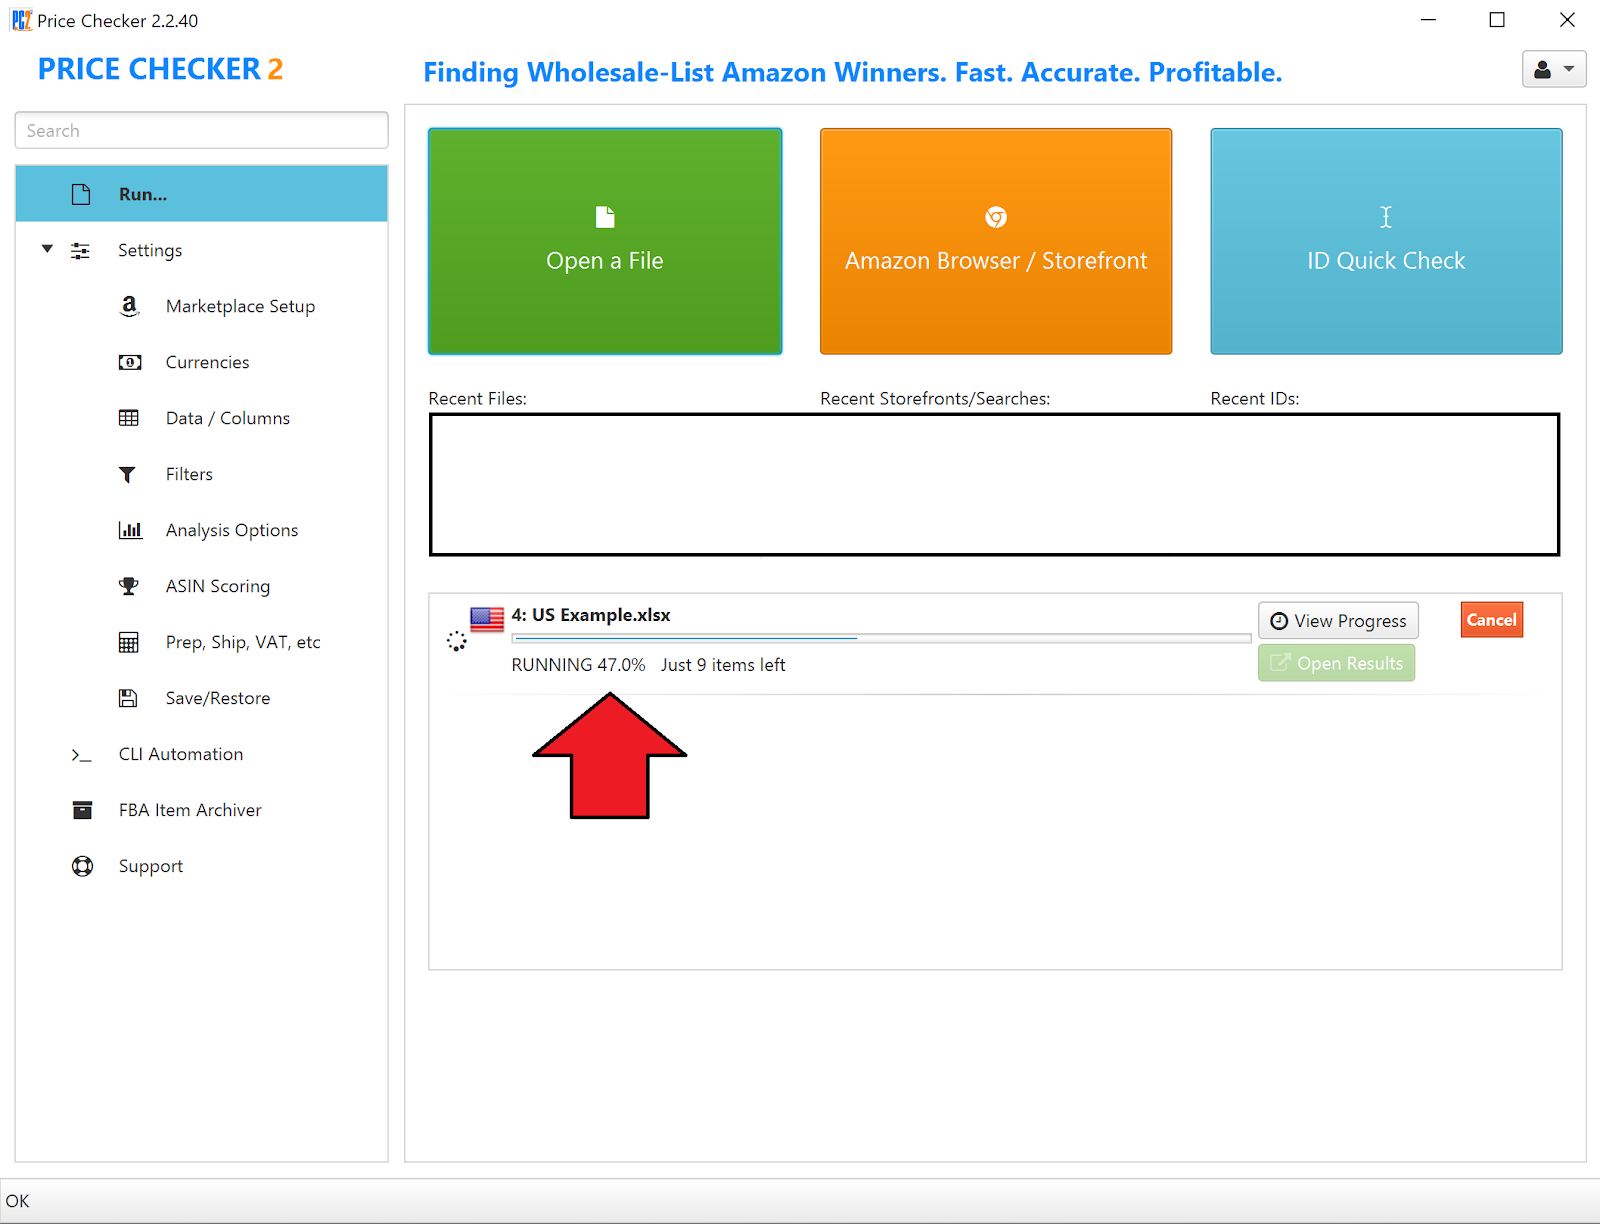
After you click start, the file will begin processing. Here’s a screenshot showing the file is running and in progress:
Once the file has completed then it’s time to open the file to review the results. Click “open results” as shown below:
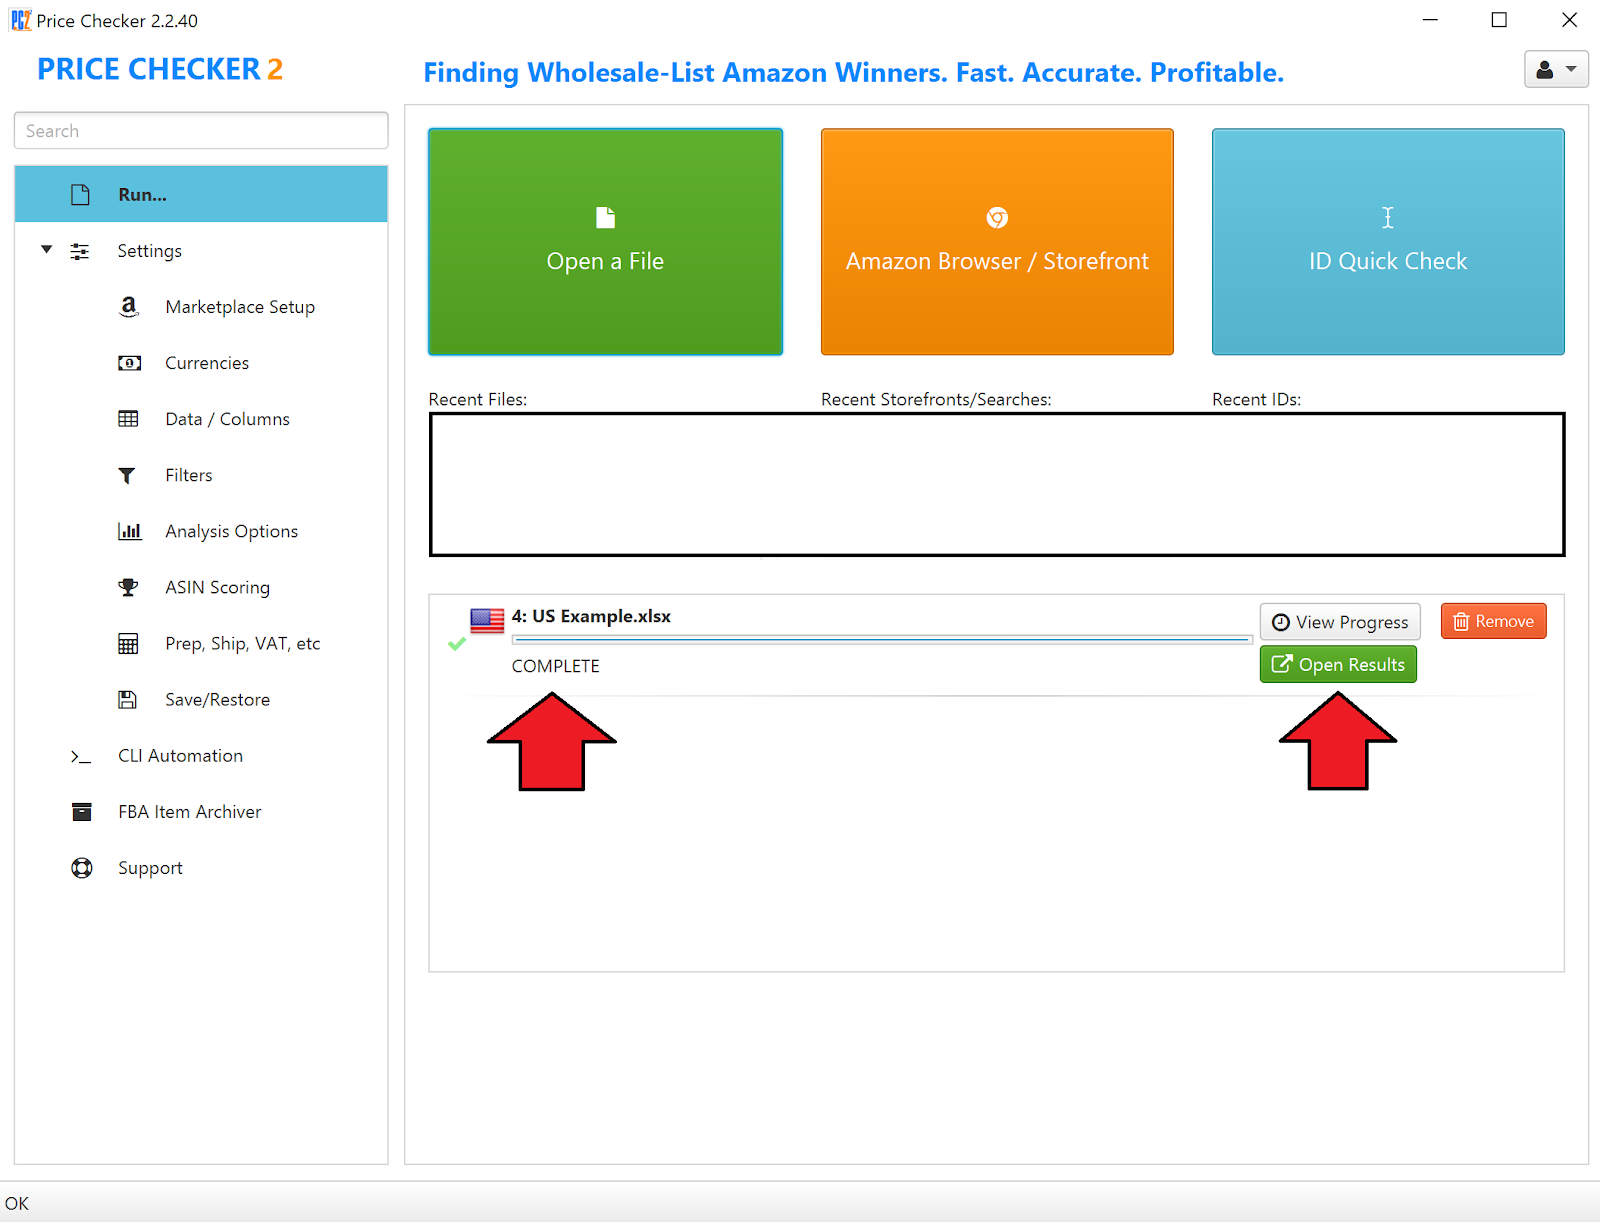
The file you open after viewing the results will be the output file you can use to decide what to purchase. Here’s a look at the output file:

As you can see there are many different data points available in the file. The minimum information you will likely need is detailed by red arrows below:
- Net ROI %
- Best Seller Rank
Most likely you will want to consider other factors in your purchasing decision as well. There are plenty of options to choose from, and I recommend looking through all of the different data points available the first time you run a file.
Price Checker 2 provides a huge amount of useful data in minutes, and it’s the tool we use most often to evaluate wholesale price lists. If you are interested in trying it out, you can test out Price Checker 2 for free here.
Tactical Arbitrage (TA)
Tactical Arbitrage is another great option to use for wholesale evaluation. It functions in a similar way to PC2 and will help you turn a price list into a file that has all of the data points you need to make a purchasing decision.
Using Tactical Arbitrage to evaluate your wholesale price lists is an especially good option if you already use Tactical Arbitrage for online arbitrage sourcing. This is because adding the wholesale functionality is a relatively small additional cost.
Here’s a screenshot of the homepage where you can go to sign up for an account and begin using this service:

Tactical Arbitrage Walk Through
We are going to be using the same example price list file as we did above for PC2.
You will need an excel file (.xlsx or .csv) saved to your computer with at least two columns with one of them containing a product identifier (ASIN or UPC) and another with the cost of the item.

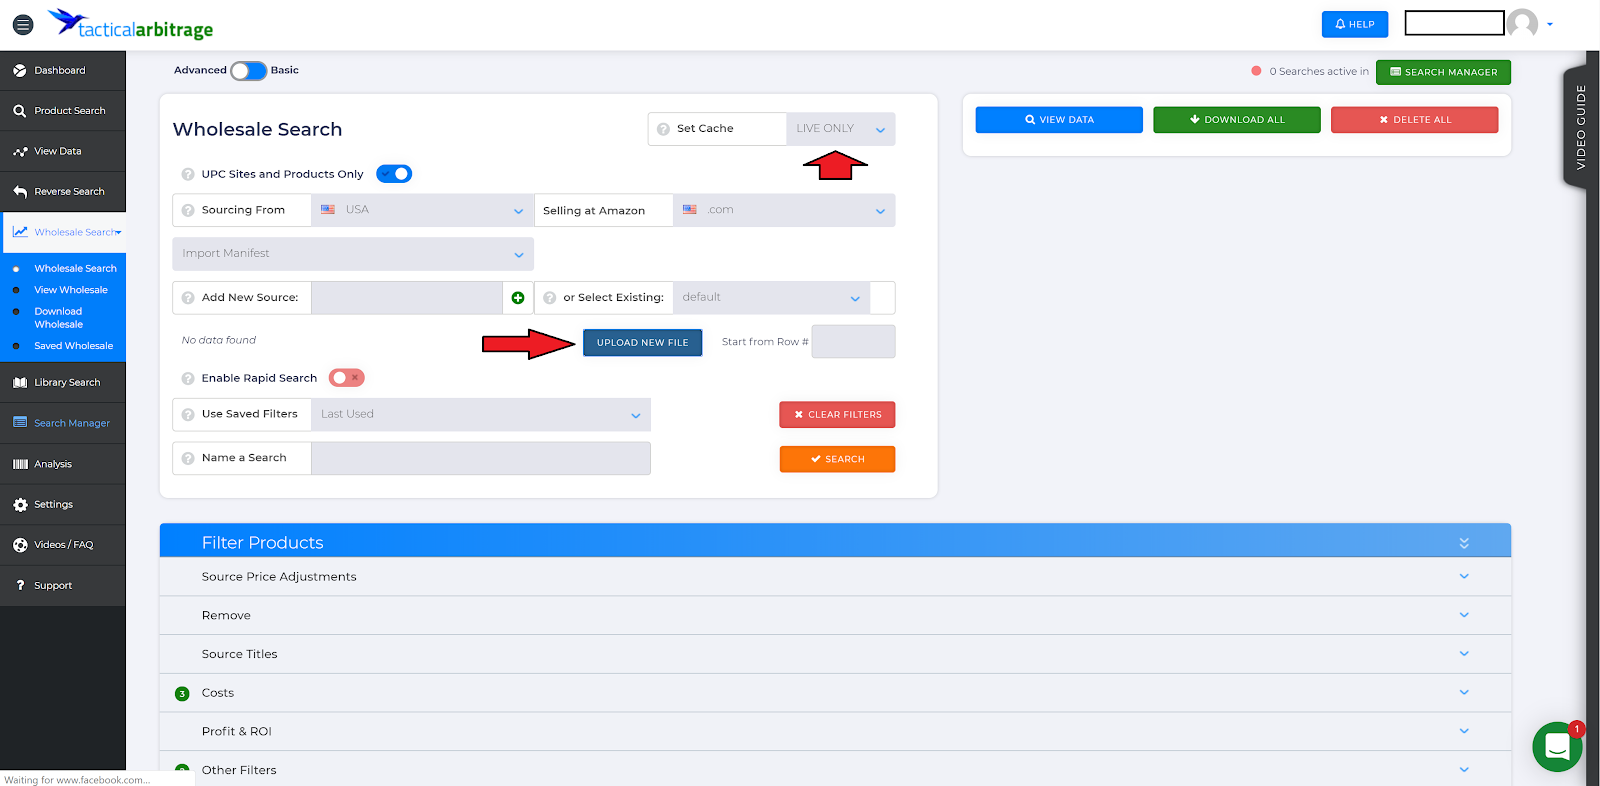
Once you have the file saved with products to evaluate, you will need to login to Tactical Arbitrage and select “Wholesale Search” as shown below with the red arrows:

Then make sure you select “LIVE ONLY” for the “Set Cache” so you have the most up to date information based on the metrics that are current.
If the cache is set to anything other than live, then the search will run much faster, but that is because it is pulling old data from other times the product has been evaluated in Tactical Arbitrage’s system. I recommend always using the “LIVE ONLY” option when evaluating wholesale price lists.
Once that is set, you’ll want to select “Upload New File” and select your price list file with ASIN or UPC and Buy Cost columns.
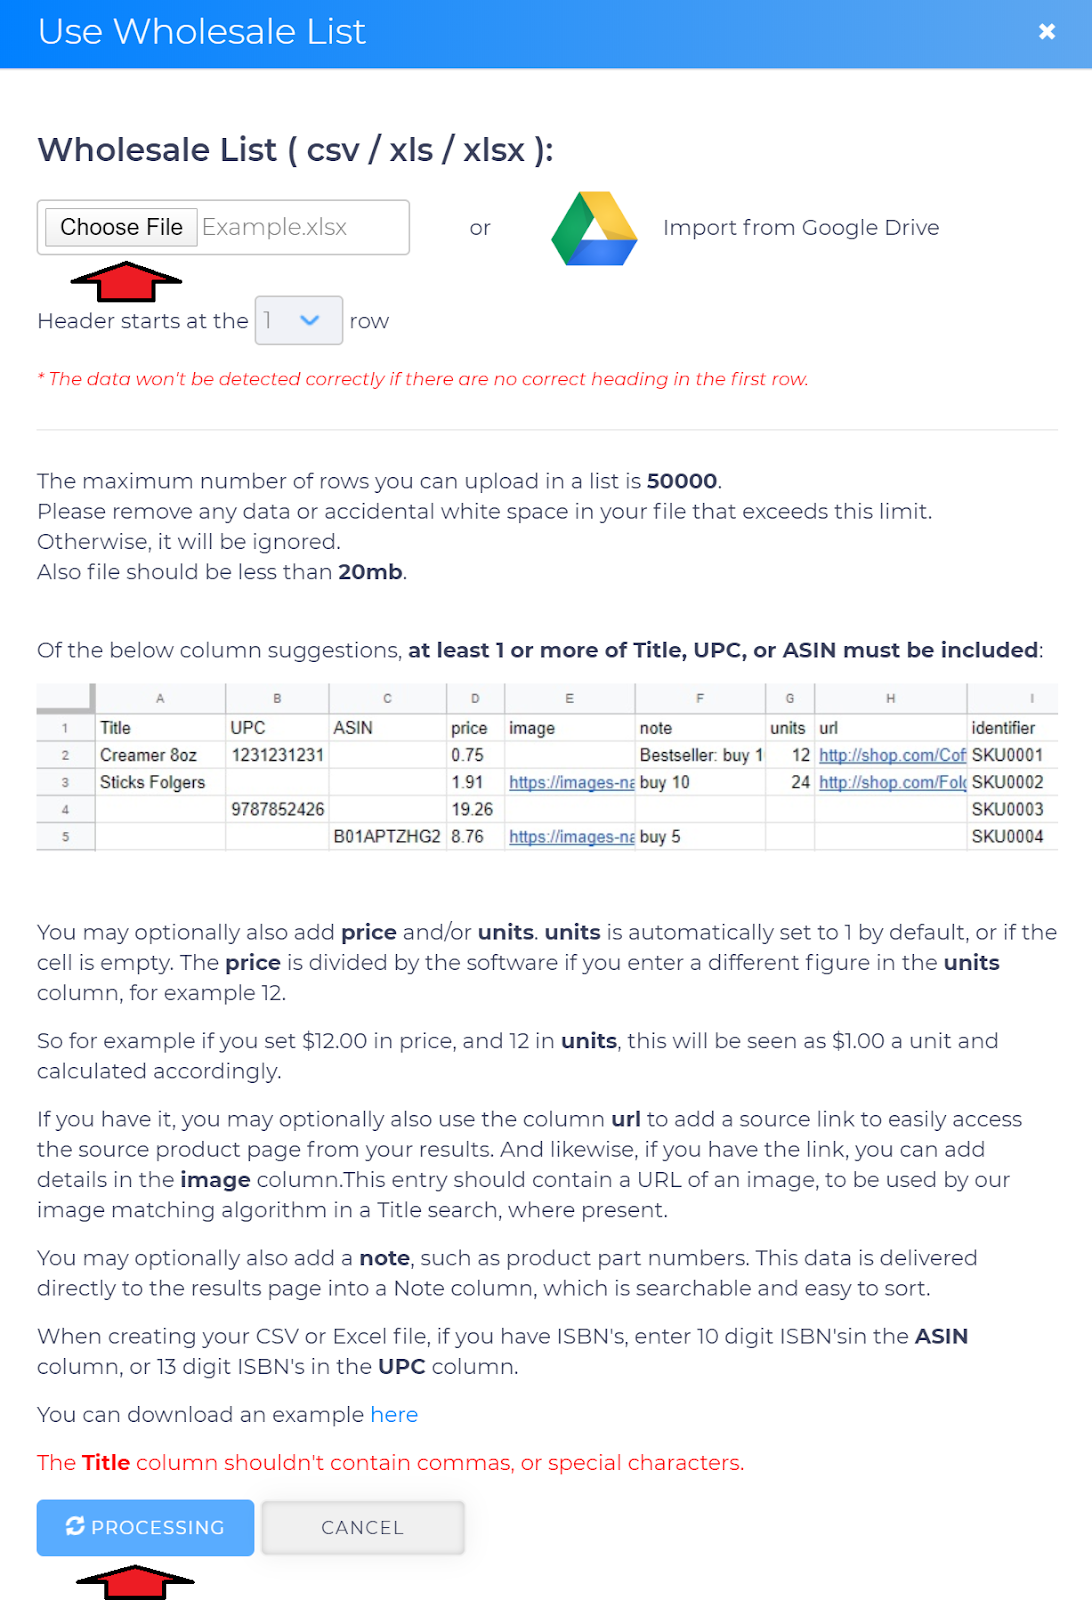
Similar to PC2, Tactical Arbitrage will want to confirm the title headers from your file are mapped correctly to evaluate the products.
As you can see below this is the first step in this process as the file is being analyzed as the red arrow at the bottom of the screenshot shows it is “Processing”.
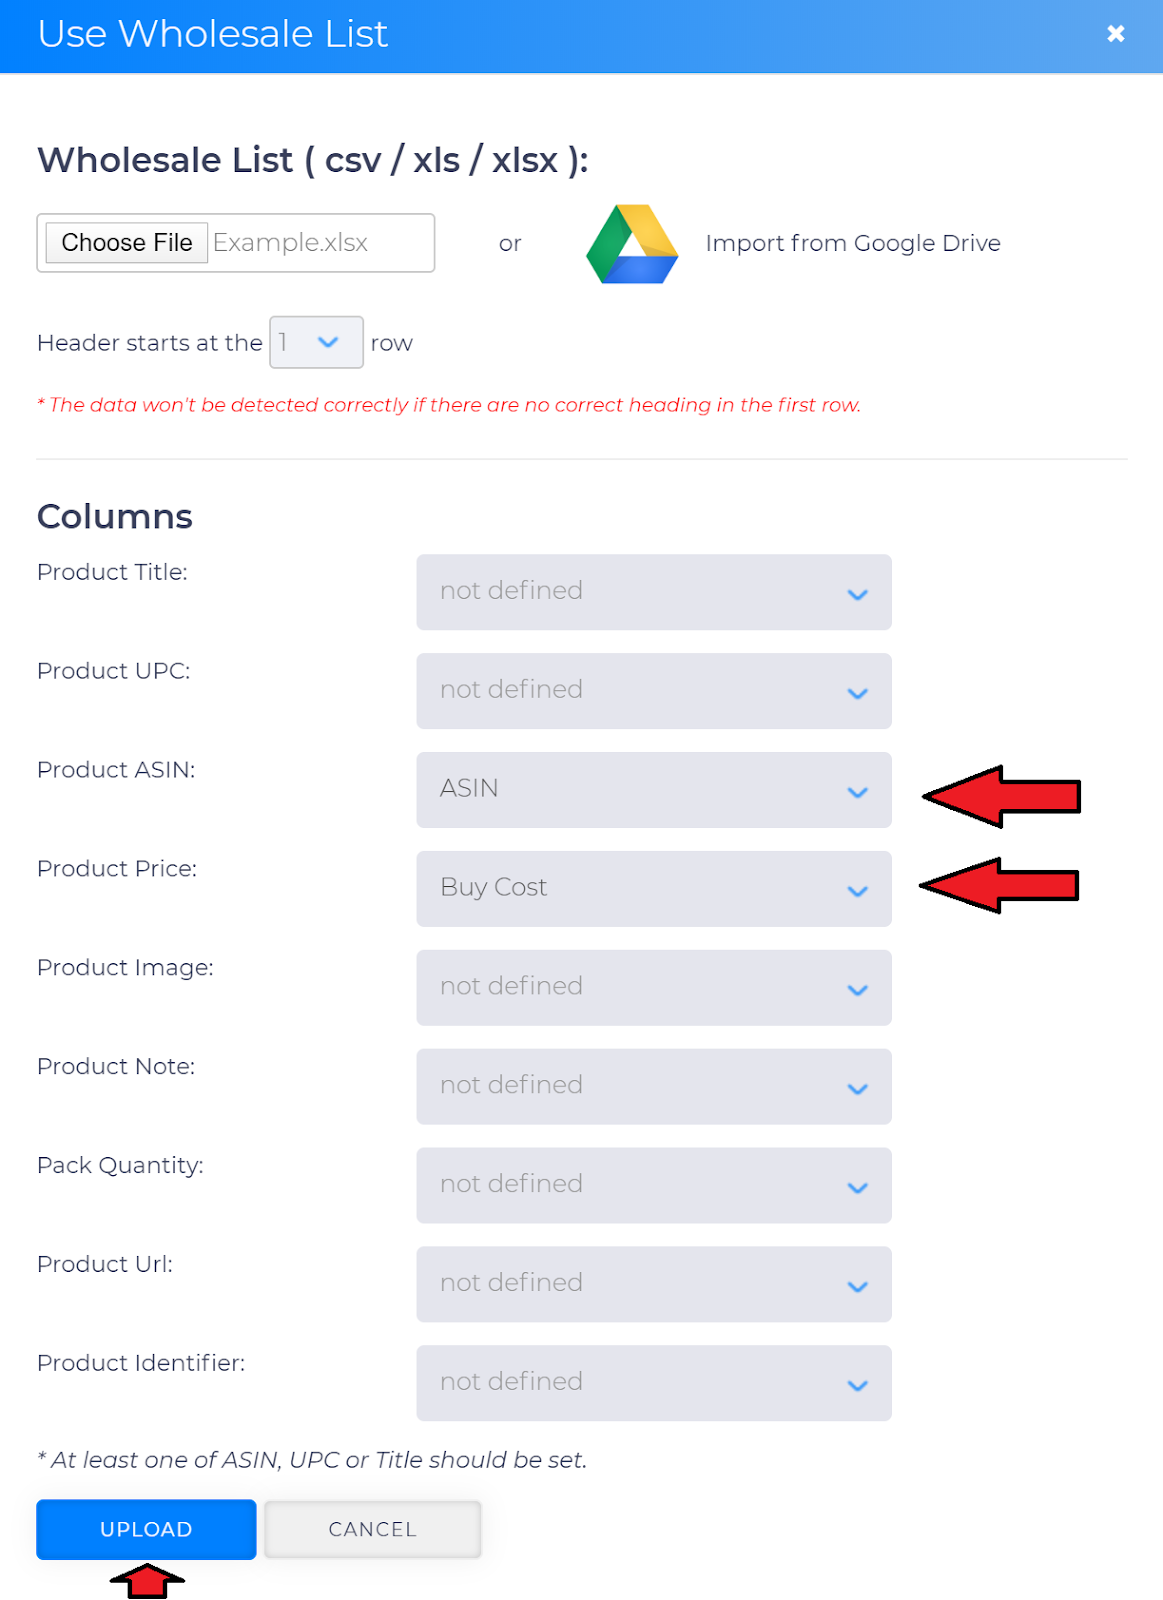
Once Tactical Arbitrage is done reading the file, you’ll want to double-check the information below and that it matched the column headers in the file you uploaded. Select “Upload” when it looks correct.
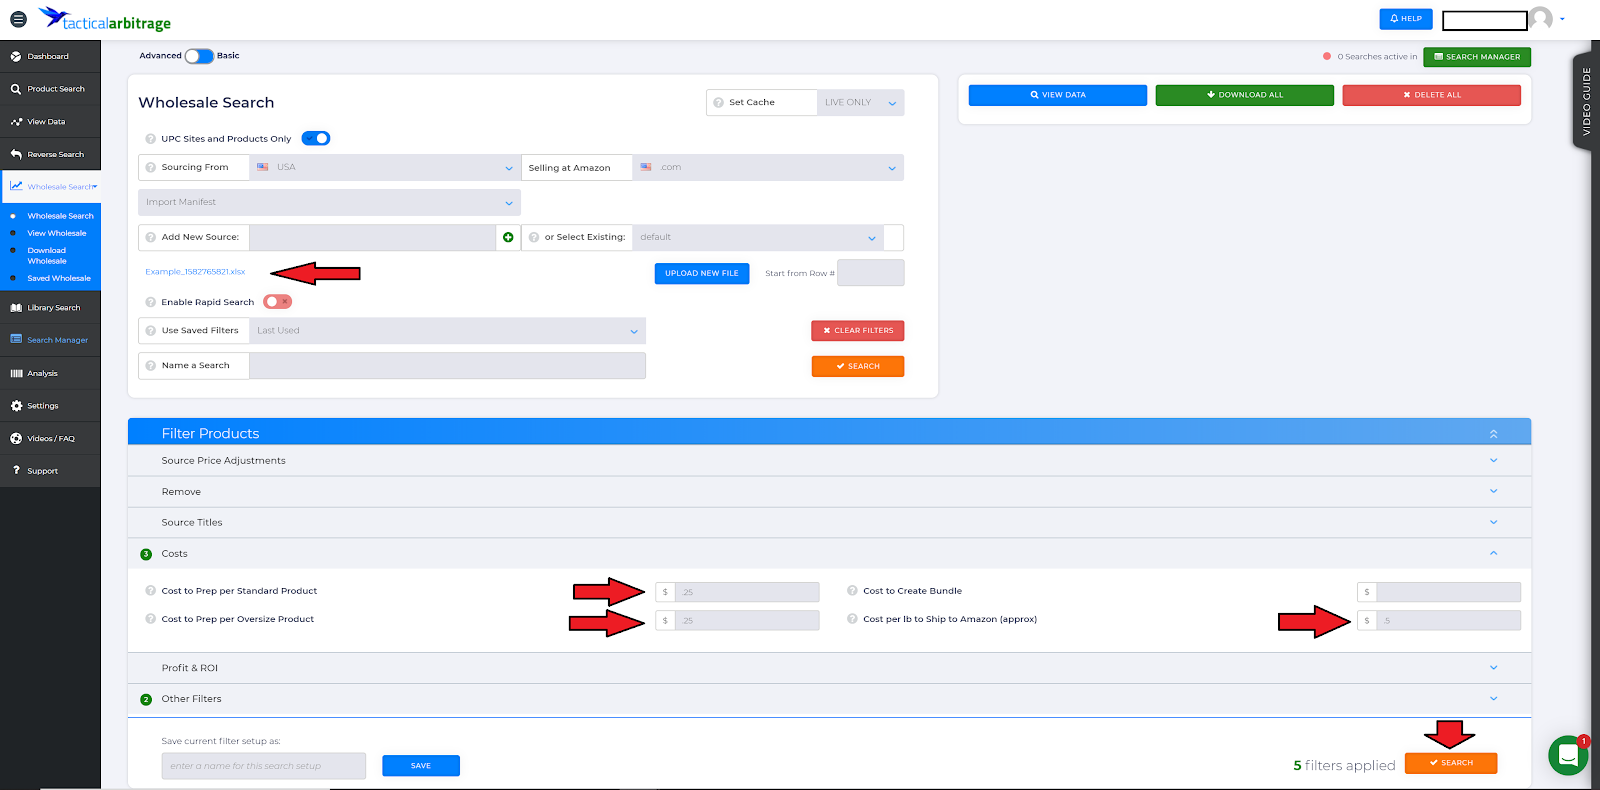
Now when back at the main “Wholesale Search” page, you will want to verify that the file name is displaying by the top left red arrow in the screenshot below.
If desired, you can put in variable costs to include in the ROI calculations for prep and shipping fees to be applied to each product. If you don’t want to include these, feel free to leave them blank. Then hit “Search” in the bottom right-hand corner of the screenshot to start the evaluation process.
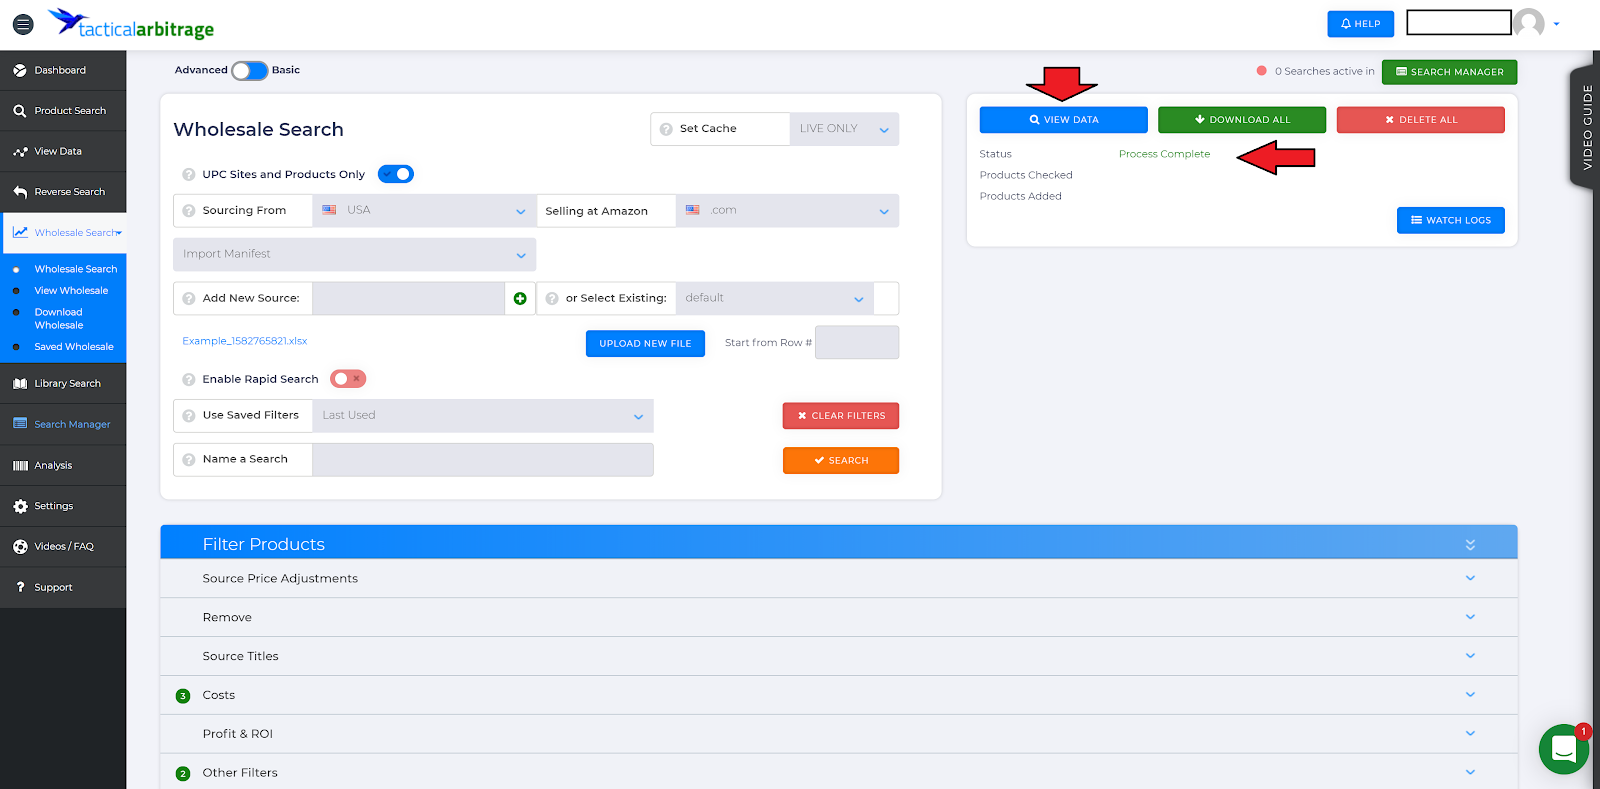
Once you see the “Process Complete” message on the screen as shown below, select “View Data” to see the results of the evaluation.
After the process is complete you will have the option to view the data online or download it. You can see an example of viewing the data online in the screenshot below.
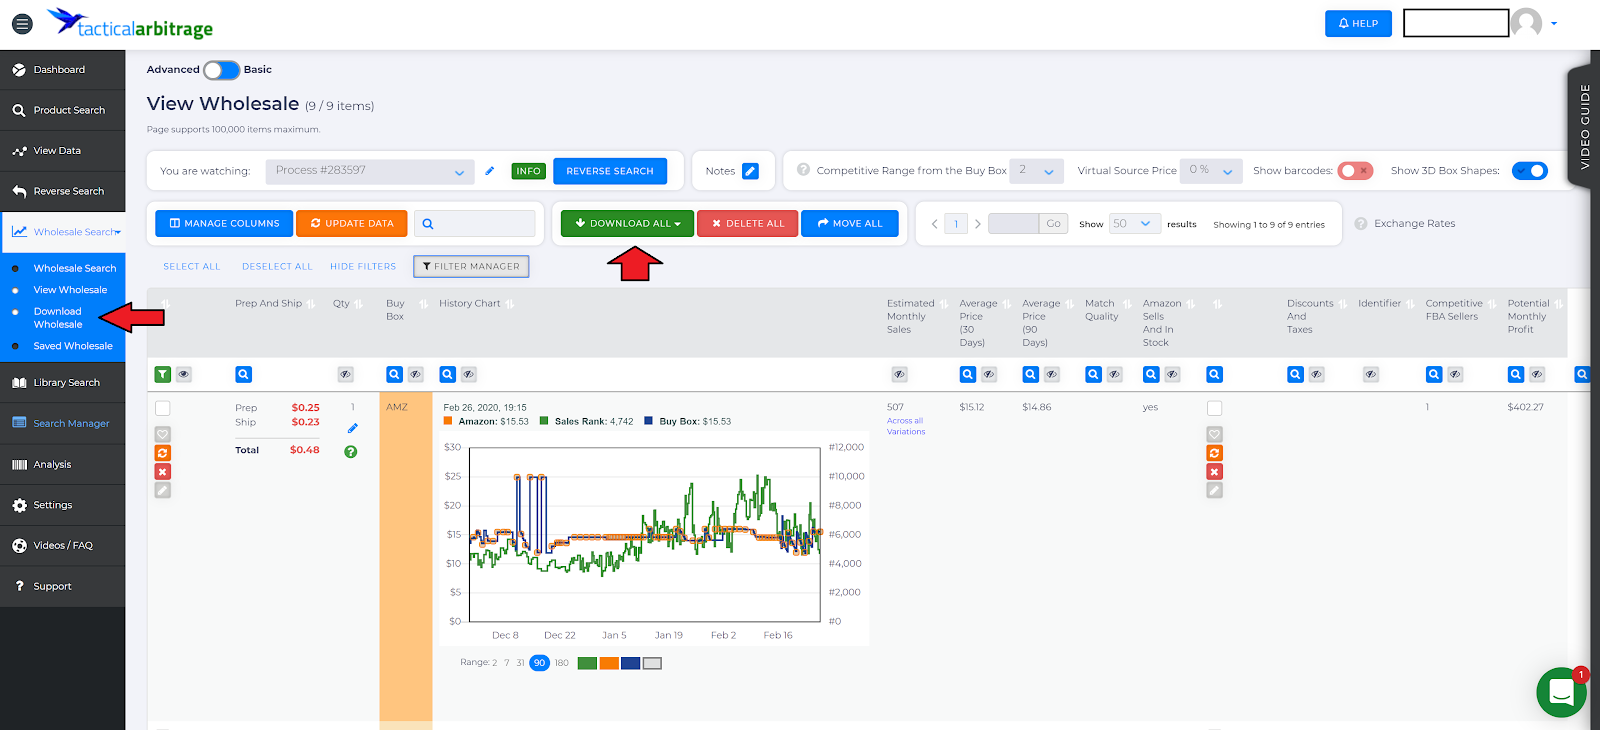
We have found it’s much easier to review in excel format, so we choose to download the data from here and you can do that by clicking the “Download Wholesale” or the “Download All” buttons as shown by the red arrows above.
Below you’ll see the excel file of the downloaded results from Tactical Arbitrage.
From here you can begin to make buying decisions from the data that correspond with your buying guidelines. I have also highlighted via the red arrows below where the two basic pieces of information are again in “Gross ROI” and “Sales Rank”.

Now many of you might say, “That’s great, but I don’t have any guidelines.” Well we got you covered!
See below for a simple way to set up your very own buying guidelines.
If you are interested in trying out Tactical Arbitrage, you can get an extended 10 day free trial with code OSE10 at checkout.
Setting Up Your Buying Guidelines
Guidelines are the criteria you set that a product must meet for you to purchase it to sell on Amazon.
As alluded to previously when walking through the tools, you’ll need to include ROI (return on investment) and sales rank in your guidelines. This is the absolute minimum to include, and you’ll likely want to include more. In this example, we’ll only include these 2 factors for simplicity.
Other things sellers commonly factor into their buying guidelines include:
- A minimum amount of gross profit per item
- If the listing includes Amazon as a seller
- How many total sellers there are
This is just a sample set of guidelines to show you the bare minimum amount of information you would need to make a buying decision.
Example guidelines:
| Sales Rank | Minimum ROI% |
| 0-50k | 40% |
| 50-100k | 60% |
| 100-150k | 80% |
| 150-200k | 100% |
With these example guidelines, you can quickly determine if the item fits your buying guidelines or doesn’t. If it fits your buying guidelines, then you should buy a quantity you are comfortable with.
If it doesn’t fit your buying guidelines, then you can skip that item.
Setting up buying guidelines makes your purchasing process much smoother. Rather than agonizing over the decision for each item, you can simply compare the metrics to your buying guidelines.
For example, an item we would buy based on the above guidelines would be: 18k sales rank, 43% ROI
An item we wouldn’t buy based on the above guidelines would be: 59k sales rank, 49% ROI
After you have been using the same buying guidelines for awhile, you should evaluate to see how they are performing. I recommend doing this on a regular basis so that you can continually improve your buying guidelines.
Using Virtual Assistants to Help
In some cases, you’ll deal with a supplier who doesn’t have a price list with the data you need in a clear format.
When you run into this it can be a very tedious process to evaluate the price list. If you sell via wholesale long enough you will run into a variety of different price list formats.
If it’s a simple fix then we’ll reformat the price list on our own. But if it’s a significant process that we think will take more than an hour, then we’ll outsource this to a virtual assistant on our team.
Virtual assistants are contractors that you can hire through services such as Onlinejobs.ph and can help solve many different problems in your business.
In the example of receiving a PDF price list that we can’t easily convert to excel, we would send the PDF to our virtual assistant. Depending on the size of the price list, we would either have them evaluate the products manually, or put products in a spreadsheet format so we could use PC2 or Tactical Arbitrage for evaluation.
For lengthy adjustments or poorly formatted price lists with hundreds of products, utilizing virtual assistants to help with this process can be a massive time savings.
Depending on your relationship with your virtual assistant, you could also have them use one of the above tools and train them in on “running” files through the software. From there they could do an initial evaluation of the file based on your buying guidelines, and send it to you for review.
If you go this route of having virtual assistants help with evaluating price lists, I recommend you own the process of doing the final checks and placing the order initially.
Virtual assistants can be a great help, and this is just one example of how we have them help in our business. We hire most often from Onlinejobs.ph, and that’s a good place to start if you’re looking for a virtual assistant for your team.
Conclusion
Being able to effectively evaluate price lists essential to your online business. This post provides multiple options that should help you more efficiently and more accurately evaluate price lists.
Using the tools and the recommendations in the post should help you continually improve the quality of inventory you purchase.
If you have any questions, please leave them in the comments section below.
Very comprehensive, well done. Thanks for sharing!
Thanks Kent!
Good article but I much prefer using Keepa API data to these off-the-shelf products (TA and PC2 – both of which rely mainly on MWS Product API which is good but not great). Keepa gives you a lot of data you don’t get anywhere else, such as running Amazon 90 day OOS %, buybox trend data, and much more.
Thanks for sharing Liam. That’s definitely a good option as well for those that have the ability to work with their API.
Best Regards,
Ryan